
Enter your email address to receive occasional offers and tips!
Sign UpThere was an error subscribing to our email list, please try again.
Don't worry. We will not share your email address with any third parties.
There was an error subscribing to our email list, please try again.
Don't worry. We will not share your email address with any third parties.
Bringing a butcher block into your kitchen isn’t just an upgrade in material; it changes the way the whole room feels. The light catches the grain, the surface warms under your hands, and suddenly the space invites you to cook, bake, and gather.
At Butcher Block Co., we offer a full range of standard and custom butcher block countertops and island tops. When your order is made to your exact specifications, installation becomes faster, cleaner, and far more predictable.
This guide shows you exactly how to install butcher block countertops in a clear, approachable way.
Before you begin, gather your tools and supplies so the process flows smoothly:
Butcher block is a natural wood product, which means it will react to the environment it's in. Before you start placing or fastening, it is crucial to allow the countertop to acclimate to the temperature and humidity of your home. To do this, place the butcher block in the room where it will be installed for approximately 3-7 days. During this time, it should be stored flat, supported evenly across its full length, and kept safely out of direct sunlight or away from any heat sources. This simple step minimizes the risk of warping, cracking, or movement after the installation is complete.
The only preparation a butcher block top requires is for sink or appliance cutouts—work that Butcher Block Co. can complete for you so the countertop arrives fully pre‑fabricated and ready to install. When your top includes a pre‑cut stove opening, no additional on‑site preparation is usually needed.
The wood can only look as good as the foundation below it.
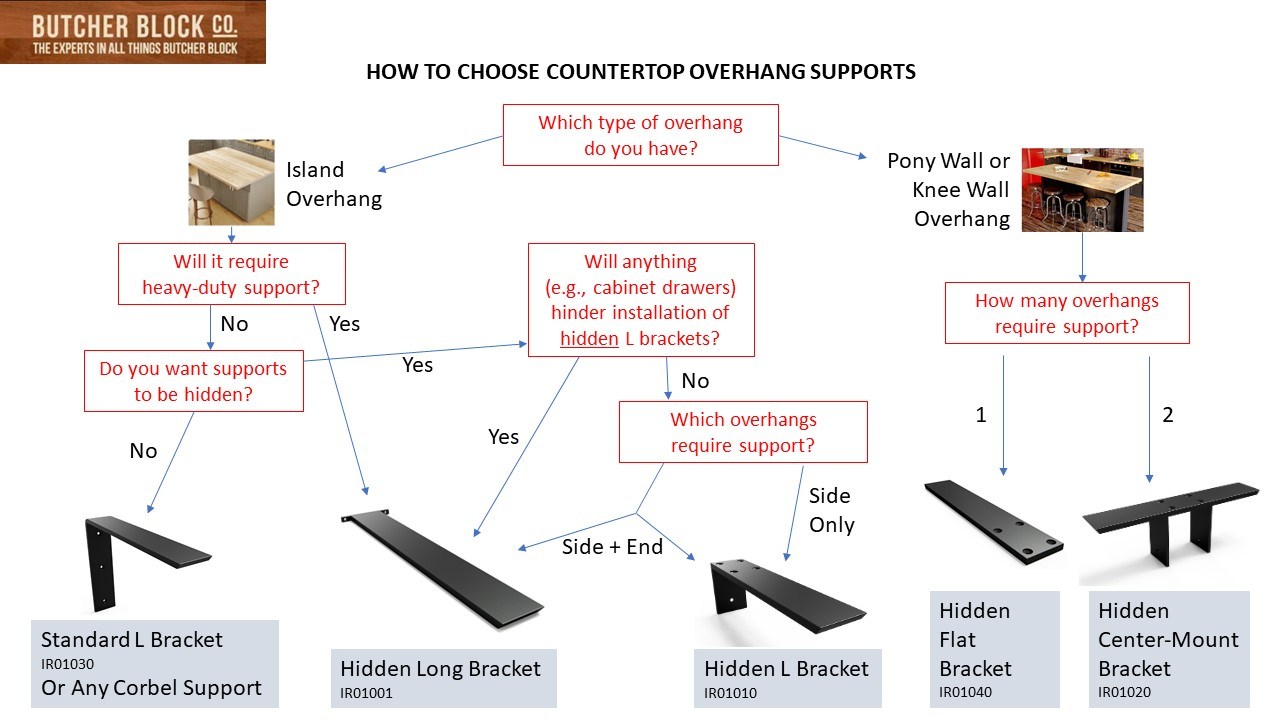
A critical step is planning for overhangs. If your butcher block will extend more than 8 inches on the side (like a breakfast bar) or 12 inches on an end of a run, you must install additional supports. We recommend iron support brackets, as they come in a variety of sizes and configurations to accommodate different cabinet layouts and island designs, ensuring the top is properly supported and protected from sagging.
If you’re remodeling, remove the old countertop carefully and disconnect plumbing and appliances ahead of time. Pull drawers and, if needed, doors so you don’t accidentally drag a heavy top across them.
One important rule: do not set your new wood top directly on an existing countertop. Butcher block needs air circulation underneath it and it needs the ability to move slightly with changes in humidity. Trapping it on top of another surface can lead to moisture problems, warping, and premature damage.
Before you apply joint fasteners or even a single screw, place all sections where they’ll ultimately live.
Use joint fasteners and clamps to pull seams tight temporarily and step back. This is the moment to make all final shim adjustments. Once the tops are fastened, corrections are much harder.
Wood isn’t stone. It swells slightly when the air is humid and shrinks when it’s dry, and a thoughtful butcher block countertop installation respects that natural movement.
At Butcher Block Co., our fastening guidance centers on one principle: hold the wood securely, but never restrict its natural expansion and contraction. The recommended method is to drill elongated expansion holes through the cabinet’s mounting rails or cleats, making each hole slightly larger than the wood screw. Use a washer under each screw head and drive the screws up into the underside of the countertop. This allows the top to move slightly as it expands and contracts, rather than stressing the wood. Never overtighten the screws, and never apply full‑surface glue between the countertop and the base.
If joining multiple butcher block pieces to make your countertop, you will want to do this prior to installing. When you order a custom countertop from Butcher Block Co., with miter joints or butt joints the counter is prepped for lineal joint fasteners on the underside to pull joints together without glue.
When you’re installing a butcher block countertop over cabinets with seating or extended edges, pay close attention to overhangs:
Iron support brackets in different sizes and shapes are ideal for island seating and deeper overhangs. They tuck neatly underneath, carry the load, and keep the wood from flexing or cracking when someone leans or sits at the counter.
A long‑lasting butcher block installation relies on the top securely floating on the cabinet’s stable framework. This holds true when anchoring the wood to the iron supports below. You will want to use a screw slightly smaller in diameter than the hole in the support to accommodate seasonal wood movement. For appropriate spacing of support brackets reference this guide.
Once your butcher block countertop is securely fastened to the cabinets and any exposed cut edges are sealed, you are ready to install your fixtures and appliances. This includes sinks, faucets, and cooktops. For all items, follow the manufacturer's specific instructions.
When installing the sink, it is critical to use an appropriate 100% silicone sealant around the sink's rims and cutouts. This creates a waterproof barrier to prevent any water infiltration from seeping into the wood, which is one of the most vulnerable areas for moisture damage.
Once the counters are in, daily habits are what keep them looking and performing their best.
Remember, wood is a living material. Small seasonal gaps at seams or changes in feel are normal as humidity rises and falls. Proper care, plus occasional touch-up work, is usually all it takes to keep everything solid and secure.